12.16.2012
9.22.2012
Johnny Appleseed {Freebies!}
We learned all about Johnny Appleseed this week! The kids LOVED it! :)
We started by doing some activities on BrainPOP Jr. If you've never used BrainPOP...it is AWESOME! The Johnny Appleseed activities are FREE right now!
{There are some free activities, but most of them require a subscription. I'm so so so lucky my school has a subscription, but you can also sign up for a one week free trail!}
We watched the video about Johnny Appleseed (only about 4 minutes) and then put pictures of his life in order. There are a few other activities, too!
{Click either image to go to the activities on BrainPOP Jr.!}
There's also a great video on Discovery Education. It's free to create an account.
{Click the image to go to the website. Just search Johnny Appleseed and click the first video in the results!}
We read Johnny Appleseed: a tall tale retold and illustrated by Steven Kellogg.
We compared the book to the BrainPOP video and of course made an anchor chart, which I forgot to take a picture of!
They wrote facts about Johnny Appleseed on the lines and drew a picture in the apple.
{Click the image to download for free!}
We also made hats! They each cut out a name plate and glued it to the middle of a sentence strip. Then they colored and cut out the apples to glue on each side. They thought these were soooo funny!
{Click the image to download for free!}
{Click the image to download for free!}
Sorry I don't have a picture of the finished product. :(
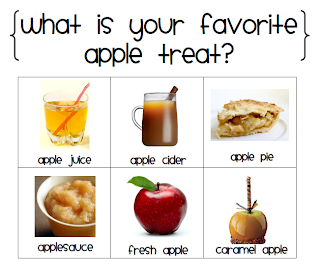
We also counted, tallied, and graphed our favorite apple treats.
Click the image to go to my previous post to download for FREE!
Hope you can use some of these activities in your classroom next week!
Enjoy the weekend!
9.19.2012
Spelling Choices!
Hey there! Hope everyone is having a great week so far!
We've had a fun few days learning about Johnny Appleseed. :) I am finally enjoying my class. We were off to a rocky start with so many students {28!}, but we've learned the rules and routines {plus we're down to 22!} ;)
I just finished my newsletter and homework for next week. I've decided to try "Spelling Choices" for part of our homework. I attempted this last year and the parents students had a hard time figuring it out. So, I revamped my choice menu with pictures and directions.
Click below to check it out!
Happy Wednesday! Can't believe the weekend's almost here!
9.08.2012
Tattle Poster - FREEBIE!
Hey everyone! Hope you are enjoying your Saturday. Mine has been spent cleaning, doing laundry, and of course, catching up on more school stuff. :)
I'm still exhausted each day...27 students will do that to you. I feel for everyone out there with a big group of firsties (or any grade level!). Even though we're getting better at following rules and routines...the amount of tattling has escalated!!
We're going to have some lessons this week on tattling vs. reporting.
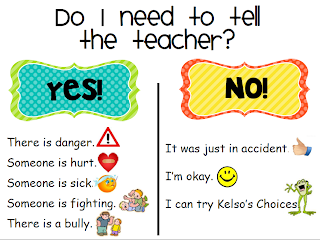
I made this poster to help my students remember what to tell and what not to tell. :)
Click the image to download your copy!
A few explanations:
I used a heart with a band-aid for "someone is hurt" to remind them that someone can be physically hurt or their feelings might be hurt. :(
The "just an accident" is for all those times someone accidentally bumps into someone or someone steps on someone's hand at the carpet or someone breathed on someone.....I could go on and on.
Kelso's Choices are different ways to handle situations before going to the teacher. I found it on Pinterest. I just "Googled" it to find the wheel of choices.
Hope someone can use the poster! Have a great weekend!
9.03.2012
Currently September
Did you enjoy your long weekend? I sure did!
These past three weeks have kicked my boo-tay. I have been exhausted after wrangling 26 first graders all day with little/no help! This is the largest class I've ever had. Luckily, there is the possibility of another class opening up...but not until after the first quarter.
Anyway, here's what I'm currently up to...
Click below to link up!

8.04.2012
Currently...in August!
Well, summer is almost over...boo hoo. I have to go back to school Wednesday, Aug. 9 and the kids come Monday, Aug. 13. Yikes! I think I am ready though. Just a few more little things to get done.
Now, on to what I'm currently doing...
Happy Saturday!
8.01.2012
Dollar Tree Shopping :)
There's nothing like hopping in the car and taking a little drive over to Dollar Tree. :) I'm lucky to have one less than two miles away.
Even though everybody and their brother was in there this evening...not to mention two ladies who had to be teachers who were standing in front of all the good stuff too long shopping as well, I managed to get some great stuff. ;)
Little cut outs...five of each in a pack.
Book marks! 24 to a pack! Love these!
Even though it's for Halloween I couldn't resist...it's hard to pass up owls. ;)
See? :) Small tote bag. Not sure what I will use this for...
Pockets...I think I'm going to use these for my students to keep their Gold Tags in!! They are neon colors.
A big monkey cut out! It even has glitter on it.
(Don't mind my new laminator in the back...hehehe.)
Bathroom and office passes.
Pointers!
That's all for now. I'm linking up with Kristen at Ladybug's Teacher Files for her Summer Shopping Linky Party!
Check it out!

7.30.2012
Monday Made It & My New Toy!
Happy Monday! I can't believe I only have two weeks left until school starts! Yikes...
This week I decided to transform my clipboard. Here's the before. B.o.r.i.n.g!
Can you believe I've been carrying this thing around for the past few years?
And now...
I just love duct tape! :)
I also made a behavior clip chart a couple of weeks ago. However, I've since read THIS POST by Kristin at The Teeny Tiny Teacher. So now I think I'm going to ditch my clip chart and go for the yellow tags! I wanted to share it any way since I'm a little sad I won't be using it. I figure I'll save it for when the students start acting like they don't know what in the world school is all about if we need a change.
Lastly, I got an early birthday present!
YAY! I have been able to get so much done! Only two people at my school are allowed to use the laminator, so needless to say, I haven't been able to laminate anything this summer!
My mom and I had so much fun laminating and cutting out all my stuff. Of course, my husband thought we were crazy. ;)
Ahhhh...freshly laminated...only teachers understand! :)
Have a great week!!
7.23.2012
Monday Made It :)
It's Monday, again!
I've been looking forward to Mondays this summer. I know that will change v.e.r.y. soon. I only have two more before school starts. :(
My Mom and I spent the weekend painting two things for my classroom. They are both thrift store finds and were cute before, but they just didn't match my room colors/decor. The pencils are now light blue and light green.
Before & After Bookcase
Before & After Table
I think they will look great now with my jungle/zebra stuff.
Next on the agenda is painting my rocking chair!
Link up with Tara at 4th Grade Frolics to share what you've made! :)
Link up with Tara at 4th Grade Frolics to share what you've made! :)
Donorschoose Gift Card Giveaway!
Check out Jennifer's awesome giveaway at Herding Kats in Kindergarten! She is giving away THREE gift cards to be used on Donorschoose projects!
Go check it out and enter to win! You can help your own project or someone else's!
7.18.2012
Monday Made It!
I actually made this on Monday night, but haven't had time to sit down and blog about it until now! :)
Here's my inspiration:
 |
| Source: Learning in Wonderland |
I wanted to have a place for all those Box Tops. I've tried sending home those sheets where they can glue them on, but only a few students ever use them. The rest of the kids who collect them just come in carrying them in their hands (and usually end up putting them on my table) or I find them crammed in their homework folders (even though that sheet I gave them for collecting them is in the folder....hmmm....).
The only thing I could find to use that I already had was an empty Kleenex box.
I just covered it in zebra duct tape!
And then I added a title!
I think I may add an actual Box Top somewhere like my inspiration did. :)
So, now they will know exactly what to do with them! I'm loving all the wonderful crafts everyone is doing!
7.08.2012
UPDATED Monday Made It - with instructions!
I am loving summer!!!
However, I can't believe it's halfway over. :(
I'm linking up with 4th Grade Frolics for Monday Made It! I feel like I've finally done something productive this summer. Every other day has been spent lounging in pajamas, reading, watching TV, reading blogs, checking Pinterest, watching TV, reading blogs, checking Pinterest, ...............
I was planning on buying a hanging file organizer this month. So glad I found this great idea HERE I made my own! :) I made mine a little bit different since I don't have a sewing machine. Duct tape to the rescue!
I used six file folders, tape, zebra duct tape, and stickers.
I'm going to use this for the things that were always on my teacher table or bookcase last year: various papers that need to put in the right place, extra stuff (newsletters, behavior calendars, etc.), clinic passes, counselor passes, and Box Top sheets.
I'm going to use this for the things that were always on my teacher table or bookcase last year: various papers that need to put in the right place, extra stuff (newsletters, behavior calendars, etc.), clinic passes, counselor passes, and Box Top sheets.
***Several bloggers have asked me to post instructions. Here are the steps I used. I basically followed the directions from the link I posted above where I found this idea.
1. Each file folder has a front and a back.
2. The front and back both have an inside and an outside.
3. The inside is where your papers would go if you were using the folder the regular way.
4. Fold down the tab edge of each folder to the outside of the front of the file folder.
5. Glue the inside of the back side of one folder to the outside of the back side of the folder that will be above it. (I know this sounds confusing, but you'll get it! :) ) The folders will be nesting inside of each other.
6. I then used duct tape on the edges to secure the folders. Then I added a little strip to kind of separate each folder.
7. Once you put the duct tape on the edges you may need to cut little slits on each side where the folder opens so that your papers will fit in smoothly. (The folders are not going to open up very far, but I don't plan on putting much in each pocket at one time.)
I hope these instructions are helpful!! :)
Happy Monday! :)
Click below to link up!
7.07.2012
New First Grade Blog - check it out!
Hey everyone, Kelly at First Grade Fairytales has a brand new blog she would like to share!
Please go visit her and give some encouragement!
Click below. :)
7.05.2012
7.02.2012
Monday Made It
I am loving summer!!!
However, I can't believe it's halfway over. :(
I'm linking up with 4th Grade Frolics for Monday Made It! I feel like I've finally done something productive this summer. Every other day has been spent lounging in pajamas, reading, watching TV, reading blogs, checking Pinterest, watching TV, reading blogs, checking Pinterest, ...............
I was planning on buying a hanging file organizer this month. So glad I found this great idea HERE I made my own! :) I made mine a little bit different since I don't have a sewing machine. Duct tape to the rescue!
I used six file folders, tape, zebra duct tape, and stickers.
I'm going to use this for the things that were always on my teacher table or bookcase last year: various papers that need to put in the right place, extra stuff (newsletters, behavior calendars, etc.), clinic passes, counselor passes, and Box Top sheets.
I'm going to use this for the things that were always on my teacher table or bookcase last year: various papers that need to put in the right place, extra stuff (newsletters, behavior calendars, etc.), clinic passes, counselor passes, and Box Top sheets.
Happy Monday! :)
***Several bloggers have asked me to post instructions. Here are the steps I used. I basically followed the directions from the link I posted above where I found this idea.
1. Each file folder has a front and a back.
2. The front and back both have an inside and an outside.
3. The inside is where your papers would go if you were using the folder the regular way.
4. Fold down the tab edge of each folder to the outside of the front of the file folder.
5. Glue the inside of the back side of one folder to the outside of the back side of the folder that will be above it. (I know this sounds confusing, but you'll get it! :) ) The folders will be nesting inside of each other.
6. I then used duct tape on the edges to secure the folders. Then I added a little strip to kind of separate each folder.
7. Once you put the duct tape on the edges you may need to cut little slits on each side where the folder opens so that your papers will fit in smoothly. (The folders are not going to open up very far, but I don't plan on putting much in each pocket at one time.)
I hope these instructions are helpful!! :)
Click below to link up!
5.06.2012
Currently & Writing Freebie!
Hello, everyone! Can you believe it's already May?? I haven't posted in a while, so here's what I'm currently up to....and little freebie. :)
Link up with Farley at
And now a little freebie! I made this to use with my firsties this week as we begin pre-writing a persuasive letter. I'm going to read I Wanna Iguana by Karen Kaufman Orloff; then have the students choose an animal and write three reasons they why they need it as a pet. Hope you can use it!
Click the pic to download!
1.09.2012
Currently {January}!
Happy Monday! I sure am beat. Today was my first day back. Luckily, we had a planning day, but I'm still tired. Tomorrow the kiddos will be there!
Link up with Oh' Boy 4th Grade and share what you're currently doing!
P.S. When you link up you'll be entered into a giveaway! Check it out!
Hope you have a great week! :)
Subscribe to:
Posts (Atom)


